
Upgrading to a Paid Account
The following two options are available for upgrading to a Paid Account, based on the type of account you are currently using:
- Upgrading from a Freemium Account - Upgrade from a Freemium Account to a Standard Subscription Paid Account.
- Upgrading from a Trial Account - Upgrade from a Trial Account to a Standard Subscription Paid Account or a Network as a Service (NaaS) Paid Account.
Upgrading from a Freemium Account
After creating an OmniVista Cirrus Freemium Account, you can upgrade to a Paid Account. To upgrade to a Paid Account, you will need an OmniVista Cirrus Subscription. Subscriptions are ordered through an ALE Business Partner, who will guide you through the process. Once the Subscription is activated, you will receive services and support as described in the OmniVista Cirrus Paid Bundles Service Description for the duration of the Subscription.
After creating an OmniVista Cirrus Subscription with your ALE Business Partner, follow the steps below to upgrade to a Paid Account. The steps must be performed in order.
- Creating an OmniVista Cirrus Subscription
- Upgrading
- Adding Devices to the Device Catalog
- Licensing Devices
- Provisioning Devices
- Starting the Activation Process on Devices
Note: After you complete the above steps and are up and running with your Paid Account, you can always add/license additional devices. Go the Device Catalog Online help for more information. Also note that any devices you may have added during your Freemium Account, will be automatically be available as part of your Subscription. Any devices added during your Freemium Account will have to be licensed for full management. And any new devices added as part of your Paid Subscription will need to be added to the Device Catalog and Licensed for full management.
Creating an OmniVista Cirrus Subscription
If you are already working with a Business Partner and have created a subscription and obtained a Subscription Number, go to Upgrading to enter your number and begin the upgrade. If you do not yet have a Business Partner, follow the steps below to locate a Business Partner.
1. Click on the GET PAID ACCOUNT button at the top of the screen. The Get Paid Account Screen will appear.
2. Click on the "Find a Business Partner" link to locate and contact a Business Partner to set up your OmniVista Cirrus Subscription. The Partner Locator website will appear.
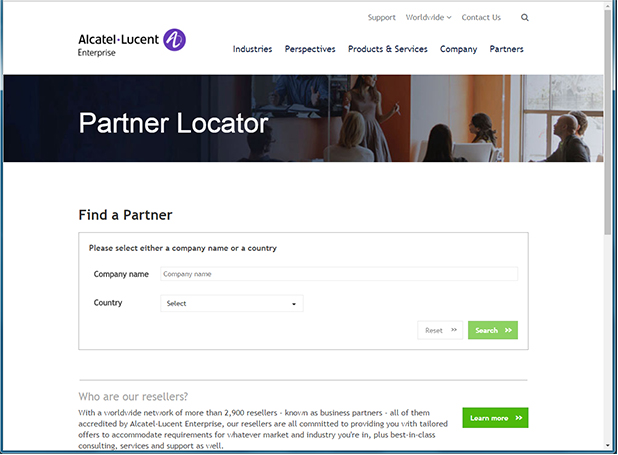
3. Enter a Business Partner Company Name to bring up contact information for a specific company; or click on the Country drop-down list to locate Business Partners in your area. If you are using the Country drop-down to locate a Business Partner, you can select multiple locations. Click on the Search button.
If you entered a specific company, the company will be displayed on the bottom-left side of the screen. If you entered a location(s), a list of companies in that location(s) will be displayed in the bottom-left side of the screen (shown below). You can refine your search using the Market Segment, Region, and Solutions filters.
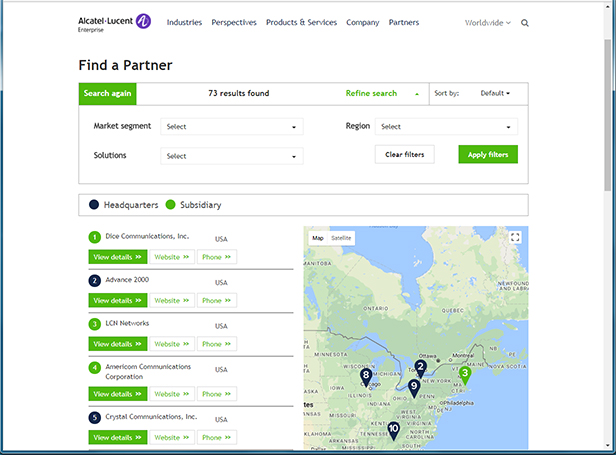
4. Click on the View Details button for additional company information, or click on the Website button to go to the company website. You can also click on the Phone button to display the company phone number.
After your OmniVista Cirrus Subscription is set up, you will be assigned a Subscription Number and Activation Code by your Business Partner to upgrade to a Paid Account.
Upgrading
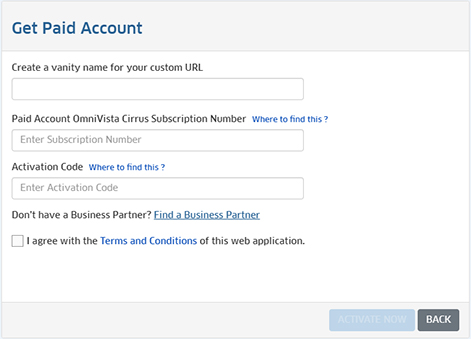
1. Log into your OmniVista Cirrus Account and click on the GET PAID ACCOUNT button at the top of the screen. The Get Paid Account Screen will appear.
2. Enter a Custom URL for your company, your Subscription Number and Activation Code, accept the "Terms and Conditions", and click on the ACTIVATE NOW button at the bottom of the screen. The Confirmation Screen below will appear.
Note: Previous releases of OmniVista Cirrus used Subscription Number and End Customer ID to identify a subscription. Beginning with Release 2.0, OmniVista Cirrus uses Subscription Number and Activation Code to identify a subscription. If you purchased a Subscription before the release of 2.0, and have not yet activated it, you can still activate it by entering the "Subscription ID" in the "Subscription Number" field, and "End Customer ID" in the "Activation Code" field.
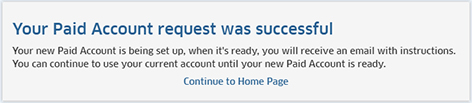
3. Click on the "Continue to Home Page" link to return to OmniVista Cirrus. You will receive an e-mail from ALE USA Inc (noreply@ovcirrus.com) containing instructions when your Paid Account is ready. (It may take a few hours for the Paid account to be processed and the email delivered).
4. Once you receive the email from ALE USA Inc, log out of OmniVista Cirrus. Click on the Go to OmniVista Cirrus button in the e-mail to open OmniVista Cirrus and log in using the username and password you initially created for your Freemium Account. The following screen will appear.
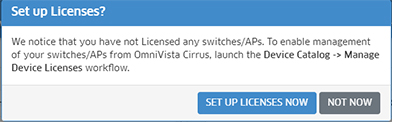
Click on the SET UP LICENSES NOW button to go to the Device Catalog Screen and license devices for full management. Click on NOT NOW to go to the Dashboard. You can set up licensing at any time from the Device Catalog Screen (Network - Inventory - Device Catalog). Remember, any devices you added in your Freemium Account will still be in your Device Catalog, but will have limited management until they are licensed.
Adding Devices to the Device Catalog
Add any new devices included in your Subscription to the Device Catalog. To add devices, go to the Device Catalog application. For detailed instructions on adding devices, click on the help link (?) on the Device Catalog Screen to bring up the Device Catalog online help.
Note: Remember, before adding a device, make sure the device is running the required software version for OmniVista Cirrus. LAN devices must be running at least a minimum software version of AOS 6.7.2.112.R03 or 8.4.1.R03. APs must be running a at least a minimum software version of AWOS 3.0.2.40. Click here for more information on required device software.
If you have trouble adding devices to the Device Catalog, click here for common problems and troubleshooting tips.
Licensing Devices
License any new devices included in your Subscription for full management. You license devices using the Device Catalog License Wizard. At the top of the Device Catalog Screen (Network - Inventory - Device Catalog), click on the Manage Device Licenses button to bring up the first screen of the wizard (below).
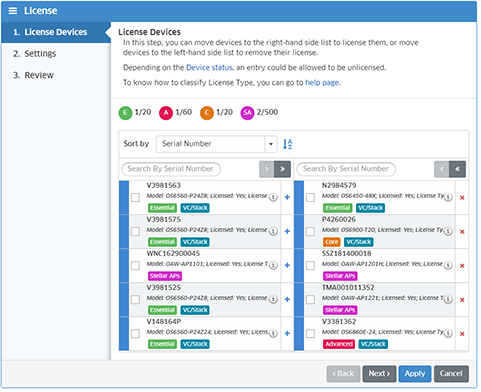
Unlicensed devices appear on the left side of the screen. License devices appear on the right side of the screen. The Device License type is displayed underneath the device description. There are different License Types (e.g., E - Essential Switch, A - Advanced Switch) for different devices types (e.g., OS6350, OS6865). The number of licenses used for each type and the total number of devices available with your Subscription is shown at the top of the screen (e.g., E 1/20, A 1/60).
To license a device, click on the Add icon to move the device from the left side of the screen to the right side. Select the device(s) you want to license and click Next.
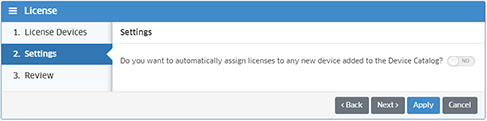
The Settings Screen (above) allows you to enable automatic licensing of any devices you add to the Device Catalog in the future. Once a device is Validated and Registered, it will automatically be assigned an available license, saving you the time of manually licensing any new devices. Move the slider to Yes to enable this option. This option can by turned off at any time. Click Next to review your licensing configuration.
 .
.
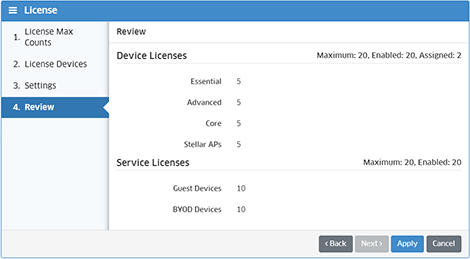
Click Apply. The Assign & Release License - Confirmation Screen will appear, displaying a list of the devices you selected to license.

Click OK. The Default Catalog Screen will open.
Note: After initially licensing devices, you can add/remove licenses to/from devices at any time. However, you must restart the activation process on the affected devices (both the devices you add a license to and the devices you remove the license from).
For detailed instructions on licensing devices, click on the help link (?) on the Device Catalog Screen to bring up the Device Catalog online help.
License Types
There are different licenses for different device types. When you select a switch in the License Wizard, the applicable license is applied to the device.
- Essential Switch (E) - OS6350, OS6450, OS6360, OS6465, OS6560
- Core Switch (C) - OS6900
- Advanced Switch (A) - OS6860, OS6860E, OS6865
- Stellar AP (SA) - OAW-AP1101, OAW-1201, OAW-1201H, AP1201L, AP1201HL, OAW-AP1221, OAW-AP1222, OAW-AP1231, OAW-AP1232, OAW-AP1251
Provisioning Devices
LAN Devices
As part of the activation process on licensed switches devices, an initial management configuration (e.g., SNMP version, device login/password) is automatically applied to the device. The configuration is contained in a Default Management Users Template that is pushed to the switch. There is no need to modify the default template (you can modify it later or apply custom templates to devices at any time). If you are only licensing switches and not APs, go to Starting the Activation Process on Devices.
Note: Once switches complete the activation process and have been successfully onboarded, you can go to the Provisioning application (Network - Provisioning) and create custom Management and Configuration Templates to push to the switches. See the Provisioning online help for more information.
APs
If you are licensing APs, open the AP Registration application (Network - AP Registration). The "Init Registration App" window will appear. This is used to set certain basic provisioning AP parameters (e.g., Country Code, Trust Status). Complete the fields in the window. This provisioning procedure will only have to be done the first time you open the AP Registration application. The configuration will automatically be applied to any subsequent APs you license.
Note: APs must be “trusted” to be managed by OmniVista Cirrus. The “Trust All” field in the Init Registration App" window is enabled by default. This can be convenient when initially adding a large number of APs. If you would like to exercise administrative intervention before accepting new APs, you might want to click on the Trust All" icon (lock in unlocked position) at the top of the Access Points screen to toggle the setting back to “Untrust All” icon (lock in locked position).
See the Provisioning online help for more information on LAN Device and AP Provisioning. See the AP Registration online help for more information on AP configuration, including "Trusted/Untrusted" APs.
Automatic Call Home Feature
LAN Devices running AOS 6.7.2.R04 (and later) or AOS 8.5R2 (and later), and APs running AWOS 3.0.4 MR1 (and later) support the Automatic Call Home Feature. These devices automatically contact the OmniVista Cirrus Server at regular intervals. For these devices, there is no need to manually start or restart the activation process. The devices will automatically contact the OmniVista Server at the configured Call Home interval.
Starting the Activation Process on Devices
A device must connect to the OmniVista Cirrus Server to complete the activation process. If it is an unconfigured device (a new device, or an old device that has been reset to the factory default configuration), or a device that supports the Automatic Call Home Feature, just connect the device to your network. Otherwise, connect the device to your network (if necessary) and restart the activation process on the device.
Connecting Devices to Your Network
Connect the device to your network and power it on. The device will automatically contact the OmniVista Cirrus Server and complete the activation process, if the Network and Device Prerequisites are met.
Restarting the Activation Process
If the device supports the Automatic Call Home Feature, the device will automatically retry the activation process. Otherwise, restart the activation process on the LAN device or AP as described below. The options for restarting the activation process on a device depend on whether you are adding the device for limited management (unlicensed device) or full management (licensed device).
Restarting The Activation Process (Limited Management)
If you are adding unlicensed devices for limited management, restart the activation process as described below.
- LAN Device - Use one of the following options:
- Manually Reboot the Device - Power on and power off the device.
- Restart the Cloud Agent on the Device - Telnet to the device and disable the Cloud Agent using the following command: cloud-agent admin-state disable force (enter y at the confirmation prompt). Then enable the Cloud Agent using the following command: cloud-agent admin-state enable.
- AP - Use one of the following options:
- Manually Reboot the AP - Power on and power off the AP.
- SSH to the AP and Reboot the AP - SSH to the AP and execute the "reboot" command.
- Use the Express UI to Reboot APs - Click on the "reboot" link next to each AP you want to reboot.
When the activation process completes, the Device Status column will display "Registered". If you have trouble activating devices, click here for common problems and troubleshooting tips.
Restarting The Activation Process (Full Management)
If you are adding licensed devices for full management, restart the activation process as described below.
- LAN Device - Use one of the following options:
- Manually Reboot the Device - Power on and power off the device.
- Restart the Cloud Agent on the Device - Telnet to the device and disable the Cloud Agent using the following command: cloud-agent admin-state disable force (enter y at the confirmation prompt). Then enable the Cloud Agent using the following command: cloud-agent admin-state enable.
- AP - Use one of the following options:
- Manually Reset the AP - Press the "Reset" button on the device until the LED starts flashing Red. When the light stops flashing or goes out, release the reset button.
- SSH to the AP and Reboot the AP - SSH to the AP and execute "firstboot" and "reboot" commands.
- Use the Express UI - If the AP Work Mode column on the Device Catalog Screen displays "Cluster", go to the Express UI, select the device(s) you want to add to OmniVista and click on the Connect to OmniVista Cirrus button.
When the activation process completes, the Device Status column will display "OV Managed". If you have trouble activating devices, click here for common problems and troubleshooting tips.
Troubleshooting
If you encounter problems adding/licensing devices, the Device Status column in the Device Catalog can be used to troubleshoot the problem. (For a Virtual Chassis, status is displayed in the VC Device Status column.)
Status |
Resolution |
Unsupported Device Model |
|
Device Validation Failed |
|
Waiting for First Contact |
|
Registered |
|
Any Other Status |
|
Subscription Expiration
When a Paid Account is 90 days from expiration, if your Business Partner has not renewed your Subscription, a RENEW SUBSCRIPTION warning (shown below) is displayed at the top of the OmniVista Cirrus screen, and OmniVista automatically sends you periodic renewal reminder e-mails. There is a 90-day Grace Period after an account expires during which you can access your account and all network management data is retained. Contact your Business Partner to renew your Subscription. Once the renewal is ordered by your Business Partner, your account is automatically updated with the renewed Subscription.

If your Business Partner orders a renewal prior to 90 days before expiration, the RENEW SUBSCRIPTION warning will not appear. However, you will receive reminder e-mails until the account automatically renews on the expiration date. Up until that time, you can verify the details of the renewal by going to the License application (Administration - License) and clicking on the Details of Extension button.
Important Note: As mentioned earlier, there is a 90-day Grace period after your Subscription expires. If you renew a Paid Account within the 90-day Grace Period, all of your data will be available with your renewed account. Once the Grace Period expires, there is no way to restore data, and there is no option to renew a Paid account. The only option is to obtain a new Subscription and OmniVista Tenant and re-configure it. If necessary, contact your Business Partner prior to the end of the Grace Period to renew your Subscription.
Upgrading from a Trial Account
The release of NaaS 3.1 introduced NaaS OmniVista Cirrus (NaaS OVC) services as an optional, licensed addition to the NaaS Connectivity Right-To-Use (RTU). This allows OmniVista Cirrus to operate in one of the following licensing modes:
- OmniVista Cirrus Standard Subscription (OVC Subscription Mode)
- OmniVista Cirrus NaaS (OVC NaaS Mode)
The licensing mode is determined when you upgrade from a Trial Account to a Paid Account by clicking on the UPGRADE TO PAID ACCOUNT button at the top of the screen and selecting Standard Subscription or NaaS from the drop-down menu.
Standard Subscription
When you select the Standard Subscription Paid Account option, follow the process described in the Upgrading from a Freemium Account section.
NaaS
When you select the NaaS Paid Account option, OmniVista will automatically start the process of upgrading to the NaaS licensing mode. In this mode, only NaaS devices (Switch/AP) that report an OmniVista Cirrus Management feature license can be fully managed by OmniVista. The following OmniVista Cirrus Management feature licenses are optionally selected based on device model when you order NaaS Device Licenses:
- NAAS*AWOS_OVC*MGMT
- NAAS*AOS_ADV_OVC*MGMT
- NAAS*AOS_CORE_OVC*MGMT
- NAAS*AOS_ESS_OVC*MGMT
Note the following when upgrading to an OmniVista Cirrus NaaS Paid Account:
- You can only upgrade to a NaaS Paid Account from a Trial Account; upgrading from a Freemium Account is not supported.
- At least one device (Switch or AP) managed in the Trial Account must be a NaaS device that is licensed with the OmniVista Cirrus Management feature. If not, you will not be able to complete the upgrade.
- CAPEX devices are no longer fully managed with a NaaS Paid Account.
Upgrading to NaaS Mode
1. Log into your OmniVista Cirrus Account and click on the UPGRADE TO PAID ACCOUNT button at the top of the screen and select the NaaS option.

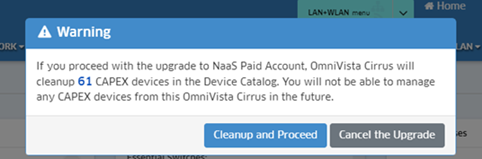
2. If there are CAPEX devices that were managed in your Trial Account, you will receive the following warning message indicating the number of CAPEX devices that were detected.
Click on one of the following options:
- Cleanup and Proceed - OmniVista will automatically remove the number of CAPEX devices from full management. Note that CAPEX devices may still appear in the Device Catalog, but will have a "Registered" Device Status.
- Cancel the Upgrade - Cancel the upgrade process; the Trial Account remains active. You can then decide if you want to remove CAPEX devices and attempt the upgrade again.
3. If you selected Cleanup and Proceed in Step 2, OmniVista Cirrus will proceed to remove the CAPEX devices from full management. The following message will display when the upgrade to NaaS mode is successfully completed:
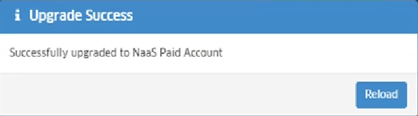
Click on the Reload button to reload the Device Catalog.
NaaS Mode Subscription Management
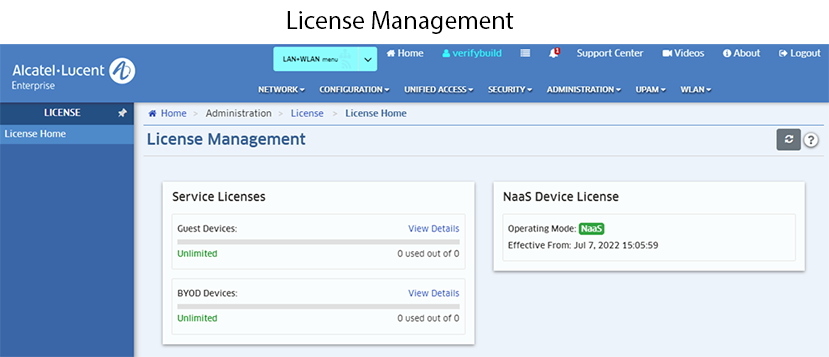
When OmniVista Cirrus is operating in the NaaS mode, any number of devices can be managed as long as the devices report that they have a valid OmniVista Cirrus Management feature license when they call-home. In addition, the License Management Screen display will change to show that OmniVista Cirrus is operating in the NaaS mode, when the mode changed to NaaS, and the number of Service Licenses for Guest and BYOD devices.
Note: Service Licenses are included as part of a Stellar AP NaaS License. Each Stellar AP NaaS License includes 100 Guest Device Licenses and 100 BYOD Device Licenses.
NaaS Mode Device Catalog
The "License" field in the Device Catalog will display values similar to what is displayed in the "Status" field of the NaaS Device Licenses Screen when OmniVista Cirrus is operating in the NaaS mode. Note that the values for the Device Catalog "License" field are derived from the OmniVista Cirrus Management feature license status. For example, Not Licensed, Licensed (Until <date>), In Grace Period.
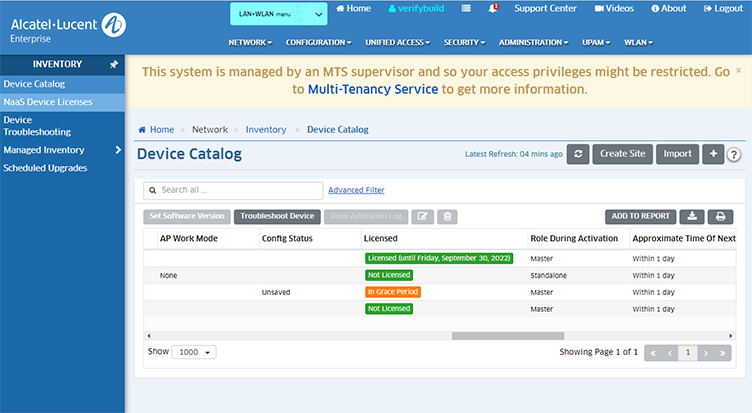
Note: CAPEX devices may still appear in the Device Catalog but will show "Registered" in the "Device Status" field; no longer fully managed by OmniVista Cirrus.