
Provisioning
The Provisioning application provides a simplified method for deployment of AOS Switches. The Provisioning application utilizes user-configured templates to automatically push Management User and Switch Configurations to AOS Switches. Using the application, you create Provisioning Rules containing Management User and Switch Configuration Templates for specific switches/switch models. When a switch contacts OmniVista Cirrus, the switch is then matched to a Provisioning Rule containing the Management User and Switch Configuration Templates for that switch/switch model. The Configuration Templates are then automatically pushed to the switch. Once the configuration is complete, the switch is added to the Managed Devices List and is manageable by OmniVista Cirrus.
- Overview of Provisioning Functionality - An overview of how provisioning AOS Switches works.
- Provisioning Prerequisites - Network prerequisites and switch configuration steps that must be completed to enable template-based Provisioning.
- How Does it Wrok? - A basic workflow for provisioning new and already deployed AOS Switches.
- Thin Switch Depolyment - How to deploy AOS Switches to run in Thin Switch mode. This mode helps to prevent sensitive information stored in the switch configuration from being tracked and enhances the switch security.
- Troubleshooting - Tips on how to troubleshoot provisioning failures and using provisioning logs.
Note: The Provisioning application is supported on switches running AOS 6.7.2.R03 GA and higher, and AOS 8.4.1.R03 GA and higher. Switches running a lower version than 6.7.2.R06 GA will be upgraded automatically if they are set up to be onboarded using this application.
Provisioning Overview
Use the Provisioning application to create Provisioning Rules containing Management User and Switch Configuration Templates for specific switches/switch models. When a switch boots up, it contacts the DHCP Server and gets the location of the OmniVista Activation Server. The Cloud Agent on the switch then makes an HTTPS call to the OmniVista Server and is matched to a Provisioning Rule containing the Management User and Switch Configuration Templates for that switch/switch model. OmniVista then uses SSH to log into the switch using the credentials specified in the Management User Template and configures/provisions the switch. Once provisioning is complete, the switch is added to the Managed Devices List and is manageable by OmniVista.
The following screens are used to provision switches:
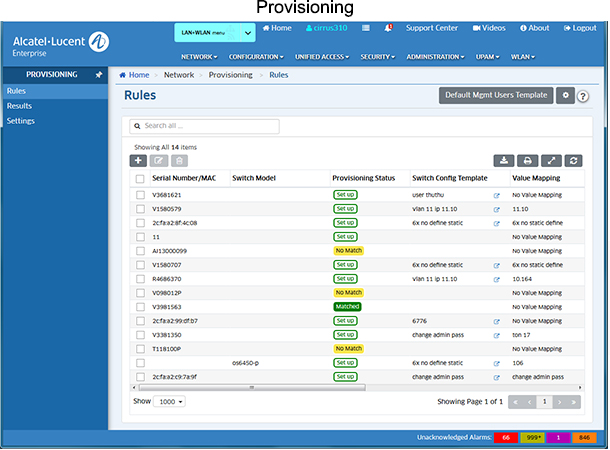
- Rules - Used to create Provisioning Rules for switches/switch models containing Management User and Switch Configuration Templates that are pushed to switches. For example, you can configure a rule that will push a configuration to a specific switch (based on serial number or MAC Address) or to all OS6860-P48 Model Switches.
- Results - Displays information about all switches that have gone through the provisioning process (e.g., templates pushed to the switch, provisioning success/failure). The screen is also used to configure a "Golden Configuration" for a switch. A Golden Configuration is created from a switch backup and can be applied to a switch in the event there is an unwanted change to the switch's Running Configuration. The screen is also used to "Force Provision" a configuration to a provisioned switch. When you "Force Provision", the configuration is pushed to the switch the next time the switch contacts the OmniVista Cirrus Server and matches a Rule.
- Settings - Used to configure Golden Configuration audit settings and onboarding rules for switches.
Once a switch is successfully provisioned, a Backup Job is also created on the switch to take automatic switch backups. The backups can be used to choose a configuration for marking it as the "Golden Configuration". See the Results Online Help for more information on the "Golden Configuration".
Basic Deployment Workflow
The Rules Screen is used to create Provisioning Rules to automatically push Configuration Templates to switches. The basic deployment workflow is slightly different for new "out of the box" switches or currently-deployed switches.
New Switches
1. Go to the Rules Screen and click on the Default Mgmt Users Template button to view/configure a default Management Template. This Default Management Template is initially applied to any switch that is successfully provisioned and enables OmniVista Cirrus management of the switch.
- When you open the Default Management Users Template, by default, "Create new credentials" under SNMP User Setup and "Use the same credential as SNMP User Setup" under "Other Access Methods" are selected. It is recommended that you use these default settings when deploying new switches. When these settings are used, OmniVista Cirrus will log into the switch with the default "admin/switch" login credentials, and then create a new user based on the Username and Auth Password configured. OmniVista Cirrus will then use this username and password to connect to, and manage the switch (addition to SSH, SNMP, SFTP). By default, the Username is "ov-enterprise". The Auth Password is automatically generated by OmniVista Cirrus. You can use these defaults, or change one or both of these fields. See the Rules online help for more information on configuring the Default Management Users Template.
Important Note: After successfully provisioning a switch(es), it is highly recommended that you change the default "admin" password on the switches. Use the CLI Scripting application to change the password. In the CLI Scripting application, you can SSH to an individual switch, or create a CLI Script to update the password on multiple switches. See the CLI Scripting online help for more information.
2. On the Rules Screen, click on the Add icon to create a Rule for a specific switch or switch model. The Rule contains identifying information for the switch/switch model, as well as Management User and Configuration Templates. For example, you can configure a rule that will push a configuration to a specific switch (by entering a serial number or MAC Address) or to all OS6860-P48 Model Switches (by entering the switch model). See the Rules online help for more information on creating Configuration Templates.
3. New switches initially boot up in the Working Directory. Switches should be running from the Working Directory for provisioning (unless the switch is provisioned as a Thin Switch, which can be running from the Certified, Working, or a user-defined directory).
4. Connect the switch(es) to the network. The switch(es) will contact the OmniVista Cirrus Server, be matched to a corresponding Provisioning Rule, and the configuration in the templates will be pushed to the switch(es). Once configuration is complete, the switch(es) will be displayed in the Managed Devices List and manageable by OmniVista Cirrus.
Note: See Matching a Rule below for more information on how Rules are pushed to switches.
Currently-Deployed Switches
Note that a switch should be running from the Working Directory for provisioning. If a switch is running from the Certified Directory, reload the switch from the Working Directory before beginning the steps below.
- 6.x Switches - reload working no rollback-timeout
- 8.x Switches - reload from working no rollback-timeout
Note: A switch running from the Certified can be provisioned, however, the configuration is temporary and will not be persisted. The switch will lose its configuration if it reboots. If a switch is provisioned from the Certified Directory, reload the switch from the Working Directory and "Force Provision" the configuration to the switch from the Results Screen. When you "Force Provision" a switch, the configuration is pushed to the switch the next time the switch contacts the OmniVista Cirrus Server and matches a Rule. See the Results Screen online help for more information on manually pushing ("Force Provisioning") a configuration to a provisioned switch.
1. If the switch is currently managed by OmniVista Cirrus, go to the Managed Devices Screen (Network - Discovery - Managed devices) and delete the switch(s). Otherwise, go to Step 2.
2. Go to the Rules Screen and click on the Default Mgmt Users Template button to view/configure a default Management Template. This default Management Template is initially applied to any switch that is successfully provisioned and enables OmniVista Cirrus management of the switch.
- Select "Use existing credentials" under SNMP User Setup. Enter the switch's/switches' current Username and Auth Password. OmniVista Cirrus will use this username/password to connect to the switch. Select "Use existing credentials" under "Other Access Methods". Enter the switch's/switches' current CLI/FTP Username and Password. See the Rules online help for more information on configuring the Default Management Users Template.
3. Enable the switch(es) to contact the OmniVista Cirrus Server for provisioning.
- LAN Device - Use one of the following options:
- Manually Reboot the Device - Power on and power off the device.
- Restart the Cloud Agent on the Device - Telnet to the device and disable the Cloud Agent using the following command: cloud-agent admin-state disable force (enter y at the confirmation prompt). Then enable the Cloud Agent using the following command: cloud-agent admin-state enable.
- AP - Use one of the following options:
- Manually Reboot the AP - Power on and power off the AP.
- SSH to the AP and Reboot the AP - SSH to the AP and execute the "reboot" command.
- Use the Express UI to Reboot APs - Click on the "reboot" link next to each AP you want to reboot.
4. On the Rules Screen, click on the Add icon to create a Rule for a specific switch or switch model. The Rule contains identifying information for the switch/switch model. For example, you can configure a rule that will push a configuration to a specific switch (by entering a serial number or MAC Address) or to all OS6860-P48 Model Switches (by entering the switch model). See the Rules online help for more information on creating Configuration Templates. When the switch(es) contacts the OmniVista Cirrus Server, it will be matched to a corresponding Provisioning Rule, and the configuration in the templates will be pushed to the switch(es). Once configuration is complete, the switch(es) will be displayed in the Managed Devices List and manageable by OmniVista Cirrus.
Note that you can retain a switch's current configuration. You do not need include a Configuration Template in the Rule. In this case, only the Management Template in the Rule will be pushed to the switch so that it can be managed by OmniVista Cirrus. If you do include a Configuration Template in the Rule, it will append the existing Configuration File with the configuration in the Rule's Configuration Template.
If you do include a Configuration Template and it conflicts with the current switch configuration, provisioning will fail and the device will not be manageable by OmniVista Cirrus. The switch will be displayed in the Results Table with a status of "Failed". You can then edit the Rule (or create a new one), and "Force Provision" the configuration to the switch from the Results Screen. When you "Force Provision" a switch, the configuration is pushed to the switch the next time the switch contacts the OmniVista Cirrus Server and matches the Rule. See the Results Screen online help for more information on manually pushing ("Force Provisioning") a Rule to a switch.
Note: See Matching a Rule below for more information on how Rules are pushed to switches.
Matching a Rule
When a new switch is connected to the network or the Cloud Agent is configured on an existing switch, the switch contacts the OmniVista Cirrus Server every five (5) minutes until it is matched to a Rule. If the switch is matched to a Rule, it is configured, added to the Managed Devices List, and is manageable in OmniVista Cirrus.
If a switch contacts the OmniVista Cirrus Server and is not matched to a Rule, you can choose how OmniVista Cirrus will handle the switch. You can:
- Allow the Switch to Onboard (Default) - The Default Management Users Template will be pushed to the switch. The switch will be displayed in the Managed Devices List and be manageable by OmniVista Cirrus. The switch will also be displayed in the Results Screen with a status of "Succeeded". From there, you have the option of creating and manually pushing a configuration to the switch at any time. See the Results Screen online help for more information on manually pushing ("Force Provisioning") a configuration to a switch.
- Do Not Allow the Switch to Onboard - A Serial Number Rule will be automatically created for the switch. The Rule will be displayed on the Rules Screen with a Provisioning Status of "No Match". The switch will continue to contact the OmniVista Cirrus Server until it matches a configured Provisioning Rule. You can configure a Rule for the switch at any time. Once the switch matches the Rule, it will be configured and be manageable by OmniVista Cirrus.
Onboarding options are configured on the Settings Screen. See the Settings Screen online help for more information.
Note: When a new switch is connected to the network or the Cloud Agent is configured on an existing switch, the switch contacts the OmniVista Cirrus Server every five (5) minutes until it is matched to a Rule. Once a switch is successfully provisioned, if you want to change the configuration on the switch, you can create a new Rule or edit the existing Rule and "Force Provision" the switch. See the Results Screen online help for more information on manually pushing ("Force Provisioning") a configuration to a switch.
Troubleshooting
Provisioning Fails
If provisioning fails, go to the Results Screen and check the "Last Provisioning Message" column for the reason. The most common cause of failure is that OmniVista does not know the correct credentials to SSH/SFTP the switch. The credentials that OmniVista uses to connect to the switch are specified in Default Management Template or in Custom Management Template on the Rules Screen. If the Configuration Template is the problem, make any necessary updates to the Configuration Template, and save it. The next time the switch contacts the OmniVista Server, provisioning should be successful.
Provisioning Logs
You can also view the Resource Manager Client Service Log in the Audit application (Administration - Audit) for more details. Click on the "Configuration" link on the left-hand side of the screen, then select "resource-manager-client-service".