Managed Devices
The Inventory application Managed Devices Screen displays a list of all network devices that are currently being managed by OmniVista Cirrus. It is also used to re-discover devices, Enable/Disable IoT on devices, Enable/Disable Statistics Collection on devices, and edit/delete/search for devices. You can also perform certain operations on devices such as ping/poll devices, configure traps, locate end stations, and reboot devices.
Note: Admin and Netadmin users will see all managed devices. For other users, the devices displayed depend on the User Role and User Group as defined in the Users and User Groups application). Only the devices in the maps associated with a User's Role will be displayed.
Note: If any managed devices have unsaved configuration changes in their Working Directory, a number will appear in the Notification icon (Bell icon) at the top of the screen. When you click on the Notification icon, the number of devices in this condition is displayed. Click on the Save Now button to save changes to the Working Directories of the devices.
Re-Discovering Devices
You can "re-discover" managed devices to update information about a device(s). To re-discover a device(s), select the device(s) in the Managed Devices List and click on the Rediscover button. The discovery will begin and a progress screen will appear. When the discovery is complete, information will be updated on the Managed Devices List.
Enabling/Disabling IoT
The IoT application provides a detailed, "real-time" view of all endpoint devices connected to AOS Switches and Stellar APs (e.g., PCs, Tablets, Smartphones). IoT is disabled on AOS Switches and Stellar APs by default. To enabled IoT on a switch/Stellar AP, select the switch(es)/AP(s) in the Managed Devices List, click on the Features drop-down, and select Enable IoT. The switches/APs will appear in the "Enable IoT - Confirm" switch picker window. (Note that switches/APs that do not support IoT will not appear in the window.) Click OK to enable IoT.
OmniVista will begin collecting IoT information for endpoints connected to the switches/APs. Go to the IoT application to view information (Network - IoT).
To disable IoT on a switch/AP, select a switch/AP in the Managed Devices List, click on the Features drop-down, and select Disable IoT button.
Enabling/Disabling Statistics
The Analytics Statistics feature enables you to collect and view performance statistics for network switches. To enable statistics collection on a switch(es), select the switch(es) on which you want to enable statistics, click on the Features drop-down, and select Enable Statistics.
Enabling/Disabling Network Advisor Monitoring
By default, OmniVista Network Advisor monitoring is disabled. To enable Network Advisor monitoring on a device(s), select the device(s) in the Managed Devices List, click on the Features drop-down, and select Enable OmniVista Network Advisor. The "Select OmniVista Network Advisor Instance" dialog opens. Select the Network Advisor instance that you want to monitor your devices from the drop-down list and click OK. You can also click on Add New to add a new Network Advisor instance to the list.
Editing a Device
You can edit a single device or edit multiple devices at the same time. To edit a single device, select a device in the Managed Devices List and click on the Edit icon. The Edit Discovery Manager Entry Screen will appear. Edit any fields as described below and click on the Apply button. Note that you cannot edit the Device Name.
To edit multiple devices, select the devices in the Managed Devices List and click on the Edit icon. The Edit Discovery Manager Entry Screen will appear and the selected devices will be listed in the IP Address Field. You can click on the device list to bring up the Selected Devices Window to display device information. Click again anywhere on the screen to close the window. Edit any fields as described below and click on the Apply button.
Note that if a field has different values among the selected devices (e.g., different location, different password), the field will be blank (drop-down menu) or grayed out ("yes/no" slider field), and a "Click to Overwrite" link will appear beneath the field. If you want to configure a common value for the field on all selected devices, click on the "Click to Overwrite" link and enter a value. If you want the values on each device to remain as they are, leave the field as it is. If you change your mind and want the fields to retain their original values, click on the "Retain Original Values" link before clicking on the Apply button.
Note: APs are edited on the Access Points Screen in the AP Registration application (Network - AP- Registration - Access Points). When you select an AP and click on the Edit icon, you will be redirected to the AP Information Edit Screen in the AP Registration application. When you apply the edit, the changes will be reflected in the Managed Devices List after the next poll. Also note that the Multi-Edit feature is not supported on APs. To edit multiple APs, go to the Access Points Screen in the AP Registration application.
Note: When you edit a device, it is important to understand that you are editing Omni-vista's knowledge of the device, not the device itself.
General
- Device Name - The user-configured device name (display only).
- IP Address - The device's primary IP address.
- Location - A user-configured location description for the device.
- Geo Location
- Street Name - Enter a location beginning with the street name, city, etc. (OmniVista will offer suggestions as you type).
- Coordinates - Enter Latitude and Longitude of the Site.
- CLI/FTP User Name - The user name that OmniVista will use to establish CLI/FTP sessions with the discovered devices. The user name specified will be used to auto-login to devices when CLI sessions are established. It will also be used to perform FTP with the device when configuration files are saved and restored (see note below).
- CLI/FTP Password - The password that OmniVista will use to establish CLI/FTP sessions with the discovered devices. The user name specified will be used to auto-login to devices when CLI sessions are established. It will also be used to perform FTP with the device when configuration files are saved and restored (see note below).
- Confirm CLI/FTP Password - Confirm the CLI/FTP Password.
- Secondary Password - The secondary CLI/FTP Password, if applicable.
- Confirm Secondary Password - Confirm the secondary CLI/FTP Password, if applicable.
Note: The CLI/FTP User Name and Password fields enable you to inform OmniVista Cirrus of the device's CLI/FTP User Name and Password. A device's CLI/FTP User Name and Password cannot be configured from OmniVista, they must be configured directly on the device. If you do not define the CLI/FTP User Name and Password and you attempt to save, restore, or upgrade configuration files for a device, you will be individually prompted for the CLI/FTP User Name and Password of each individual device for which configuration files are being saved, restored, or upgraded. Also, OmniVista will be unable to auto-login to the device when establishing CLI Scripting sessions.
SNMP
The available fields depend on the SNMP version running on the device.
- SNMP Version - The SNMP version that OmniVista Cirrus will use to communicate with the device.
- Timeout (msec) - The time period, in milliseconds, that OmniVista will wait for a switch to respond to a connection request before assuming that the request has timed-out (Default = 5,000).
- Read Community - The device's "get" community name. The "get" community name enables OmniVista to read information from the device (see note below).
- Write Community - The device's "set" community name. The "set" community name enables OmniVista to write information to the device (see note below).
- Retry Count - The number of times that OmniVista will attempt to connect to a switch (Default = 3).
- User Name (SNMP v3 Only) - The SNMP version 3 user name.
- Auth & Priv Protocol (SNMP v3 Only) - The authentication protocol OmniVista will use for SNMP communication with the device. Authentication uses a secret key to produce a "fingerprint" of the message. The fingerprint is included within the message. The device that receives the message uses the same secret key to validate that the fingerprint is correct. If it is, and if the message was received in a timely manner, then the message is considered authenticated. Otherwise, the message is discarded.
- Auth Password (MD5/SHA) - The password that OmniVista will use for the MD5 or SHA authentication protocol. This must be the same password that is defined on the switch for MD5 or SHA. If no authentication password is entered, neither authentication nor privacy encryption will be used.
- Confirm Auth Password (MD5/SHA) - Re-enter the Auth password.
- Private Password (MD5/SHA) - The password that will be used as the secret key. This must be the same password that is defined on the switch for the CBC-DES Symmetric Encryption Protocol. If an authentication password is entered, but no privacy password is entered, authentication will be used without privacy encryption.
- Confirm Private Password (MD5/SHA) - Re-enter private password.
- Context Name - A unique context name for this context. An SNMP context is a collection of management information accessible by an SNMP entity, in this case OmniVista Cirrus. A context identifies a subset of management information, in this case the management information OmniVista has about the individual device. OmniVista, as an SNMP entity, has access to many SNMP contexts: one for each device it manages. Each context must be identified by a unique context name and a unique context ID. Note that an item of management information may exist in more than one context. Technically, the Context Name and Context ID provide a means of distinguishing specific instances of information in the MIB modules from the set of all instances of that information within the management domain.
- Context ID - A unique context ID for this context. As explained above, each context must be identified by a unique context name and a unique context ID. Note that neither the Context Name nor the Context ID are required.
Note: If a device's "get" and "set" community names are "public" (the default) you can leave these fields blank (OmniVista uses the default name (public) when the field is blank. The community names are not configurable from OmniVista, they must be configured directly on the device. Also note that when you use SNMP Version 3, community names are ignored.
Advanced Settings
- Trap Station User Name - The user name that will be used when a device is configured to send traps to OmniVista. Devices require that a valid device user name be specified with the trap station configuration entry. If this field is left blank, the following switch user names will be used by default for trap station configuration entries:
- If OmniVista is configured to use SNMP version 3 with this device, the SNMP version 3 user name entered for the device will be used as the switch user name in the trap station configuration entry.
- If OmniVista is configured to use SNMP version 1 or SNMP version 2 with this device, the read community string for the device will be used as the switch user name in the trap station configuration entry.
When using SNMP version 1 or 2, switch user names are interchangeable with community strings as long as community string mapping is not in use on the switch. If community string mapping is not in use, and a switch is discovered using SNMP version 1 or 2 with a default read community string of "public", or even with a non-default read community string such as "thomas", these community strings are valid switch user names for trap station configuration entries. In this case, no further configuration is required and this field can be left blank. However, if community string mapping is enabled on the device, the community string with which the switch is discovered is not guaranteed to be a valid device user name, and thus is not guaranteed to be a valid device user name for a trap station configuration entry. In this case, you should enter a valid device user name in the Trap Station User Name field.
- Discover Link - Specifies how OmniVista Cirrus will discover the device's links to other devices.
- Shell Preference - OmniVista's CLI Scripting application supports both the Telnet and SSH command line interfaces. SSH (Secure Shell) is a Telnet-like utility that provides encryption and is far more secure than Telnet. If you select SSH, SSH will be used as the default command line interface for the device. In addition, Secure Shell FTP will be used as the default FTP method in Resource Manager. If you select Telnet, Telnet will be used as the default command line interface for the device and regular FTP will be used as the default FTP method in Resource Manager. Ensure that devices are capable of SSH before you enable the Prefer SSH checkbox. OmniVista does not verify devices' SSH capabilities. All AOS devices are SSH-capable. (Default = SSH)
- Use Get Bulk - Enables/Disables Get Bulk Operations. The SNMP version 2 Get Bulk operation is used for retrieving large amounts of data, particularly from large tables. The Get Bulk operation performs continuous Get Next operations, each time requesting the number of table rows specified by the value in the Max Repetitions field (below). For example, if the value in the Max Repetitions field is 10, each Get Next operation will request 10 rows of table data. Note that the number of rows of data actually returned by the device will be determined by the amount of memory the device has available at that time. Note that "Use Get Bulk" is only applicable to device discovery or polling. Other applications in OmniVista (e.g., Statistics) may internally use getBulk operations to retrieve data from devices regardless of the option chosen here. (Default = Enabled)
- Max Repetitions - The number of rows of table data that the Get Bulk operation will request in each Get Next operation, if enabled.
Deleting a Device
Select a device(s) and click on the Delete icon, then click OK at the confirmation prompt. Note that when you delete an AP, the device is removed from the Managed Devices List and placed into "Unmanageable" status on the Access Points Screen.
Searching for a Device
You can search for a device by keyword by entering the search criteria in the Search fields at the top of the Managed Devices List. Enter any search criteria based on the contents found in the list and the list will change to display only those device containing the search criteria.
Perform Device Operations
You can also perform certain operations on devices in the Managed Devices List such as ping/poll devices, configure traps, locate end stations, and reboot devices. Select a device(s) in the Managed Devices List. Click on the Actions drop-down at the top of the Managed Devices List and select an option. Note that not all operations are supported on all devices; and some operations can only be performed on a single device, not multiple devices. If an operation is not supported for the selected device(s), it will be grayed out in the list.
- Ping - Immediately pings the selected device(s). Progress is shown on the Progress Screen. Click the Finish button to return to the Managed Devices Screen. Execution of the Ping operation is different depending on the device type:
- AOS Devices - OmniVista performs an SNMP ping first. If the SNMP ping succeeds, OmniVista reports the operation as successful. If it fails, OmniVista generates an "alaSNMPDown" trap and continues to perform an SSH/Telnet ping. OmniVista uses Telnet or SSH based on Shell Preference (default = SSH). If the SSH/Telnet ping succeeds, OmniVista reports the device ping operation as successful. If it fails, OmniVista reports the operation as failed and generates an "alaOvSwitchDown" trap. Note that for an SSH/Telnet ping, OmniVista does not use require any user credentials for authentication. It is just ping test.
- APs - OmniVista checks device reachability and manageability via WMA. If it succeeds, OmniVista reports the operation as successful. If it fails, OmniVista reports the operation as failed and generates an "alaOvSwitchDown" trap.
- Poll For Traps - Immediately polls the selected device(s) for traps. A message is displayed at the top of the Managed Devices Screen when polling is complete. Traps can be viewed in the Notifications application.
- Poll Links - Immediately polls links on the selected device(s). Progress is shown on the Progress Screen. Click the Finish button to return to the Managed Devices Screen.
- Configure Health Thresholds - Brings up the Configuring Devices Health Thresholds Screen. Health Thresholds are used to set limits for health traps. If a device has been configured to send health traps, a trap will be sent whenever a monitored item's current utilization exceeds the configured health threshold. Configure the CPU, Memory, or Temperature Threshold for the selected device(s) and click on the Apply button. Note that changes made to health thresholds will not appear until the next polling cycle (up to an hour).
- Locate End Stations - Launches the Locator application and searches for all end stations that are attached to the selected switch. All end stations found are displayed in the Locator application's Browse Screen.
- Backup Device - Launches the Backup Wizard in the Resource Manager Application, which enables you to perform a configuration backup of the selected devices.
- SSH - Opens up an SSH or Telnet session with the selected device on the Terminal Screen in the CLI Scripting application.
- Configure Traps - Launches the Trap Configuration Wizard in the Notifications application to enable you to configure traps for the selected devices.
- View Traps - Opens the Notifications Home page to display traps for the selected device.
- Reboot - Reboots the selected device(s) You have the option of rebooting from the Working, Certified, or Other Directory and setting a time for the reboot. Click on the Reboot operation link and use the Reboot From drop-down to select the directory you want to reboot from. In the Reboot Delay drop-down select when you want to reboot to occur (now, a specific number of minutes from now, or at a specific date and time). Note that when you reboot multiple devices, there is a minimum delay of 30 seconds before the devices reboot (even if you select the Reboot now option). If you select a large number of devices, the delay is equal to roundoff of (30 + (deviceCount/4), in seconds (e.g., if you select 1,000 devices, the delay is 280 seconds, or 4 minutes). The delay allows time to push the "Reboot" command to all devices.
- Copy Working/Running to Certified - Copies the contents of the working/running directory in the primary CMM to the certified directory in the primary CMM. Note that the Copy Working to Certified command also automatically synchronizes the switch's CMMs after the copy operation is completed.
- Copy Certified to Working/Running - Copies the contents of the certified directory in the primary CMM to the working/running directory in the primary CMM. For AOS 6 devices, this means that if the device is running from the Certified Directory, this will copy the configuration from Certified to Working directory, then change the Running directory to the Working directory. For AOS 5 and AOS 8 devices, if the device is running from the Certified Directory, this will copy the configuration to the Certified Directory.
- Save to Running - Saves the primary CMM's current running configuration to the current running directory of the switch. OmniVista supports the Multiple Working Directories Feature on certain devices (e.g., OS10K, OS6900). This feature allows the user to create multiple "working" directories on the switch that can be used to save specific switch configurations. When the Save to Running Command is executed, the device(s) save the CMM's current running directory to the current user-defined "working" directory (Running Directory). Note that if you select a group of devices and some do not support multiple working directories, the devices will save the CMM's current running directory to the device's current "working" directory, whether it is a user-defined directory or the Working Directory.
Displays
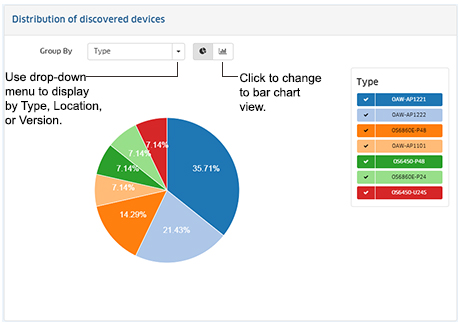
By default, device information is displayed in a list view. You can also click on the Chart View icon at the top of the screen to view graphical charts breaking down devices device type, AOS version, and physical location.
Note: The information displayed in the Managed Devices List is updated based on the frequency settings configured on the Discovery Setting Frequencies Screen. You can perform an immediate poll on a device(s) to update information by selecting the device(s) in the list and clicking on the Rediscover button at the top of the list.
Managed Devices List
The Managed Devices List displays basic information on all devices managed by OmniVista Cirrus. There are two tabs. The "ALL" tab displays all managed devices (LAN Devices and APs). The "OAW" tab displays only managed APs. Click on a device to display detailed information for the device.
Note that if any devices in the Managed Devices List have unsaved configuration changes in their Working Directory, a number will appear in the Notification Icon (Bell Icon) at the top of the screen. Click on the Notification Icon. The number of devices in this condition is displayed. Click on the Save Icon button to save changes to the Working Directories of the devices.
Basic Information
- Friendly Name - The user-configured name for the device. If no name is configured for the device, the IP address is displayed. By default, if a Device Name is configured, the IP address and Device Name are displayed. Note that you can click on the device Friendly Name to automatically go to the Topology application, where the device is highlighted in the Topology map.
- Name - The user-configured name for the device.
- Address - The IP address of the device. Note that OmniVista Cirrus supports duplicate IP addresses for different physical sites. For example, a Tenant may have multiple physical sites, each with its own DHCP Server. In this case, the same IP address may be used in multiple sites (OmniVista Cirrus manages devices based on VPN IP address). You can identify devices with the same IP address by referring to the device Friendly Name or Device Name. If no Device Name was configured for a device, you can identify the device by going to the Device Catalog Screen and clicking on the Device's Serial Number to highlight the device in a Topology Map. At this point you could also edit the device to add a Device Name.
- MAC Address - The MAC address of the device.
- Serial Number - The device serial number.
- Status- The operational status of the device.
- AOS Devices
- Up - Device responds to SNMP requests or SSH/Telnet (as per Shell preference) ping request from OmniVista. "Up" Status does not necessarily mean that device is manageable from OmniVista. Refer to the "SNMP Status" column for management status.
- Warning - There is one or more unacknowledged trap on the device.
- Down - Device does not respond to SNMP Requests as well as Telnet/SSH ping requests from OmniVista.
- APs
- Up - AP is manageable from OmniVista.
- Warning - There is one or more unacknowledged trap on the device.
- Down - Device is not manageable from OmniVista. However, it may still be "Up" and functional in the network.
- AOS Devices
- Type - The type of device chassis (e.g., OS6860E-P24).
- Version - The version number of the device software (e.g., 8.4.1.143.R03).
- AP Group Name - The name of the AP Group to which the AP belongs, if applicable.
- Data Elans - VLAN(s) used for traffic of client connected to the AP (q-tagged VLAN).
- Management VLAN - The VLAN used to connect to the AOS Switch (untagged VLAN).
- SSIDs - The SSID of the AP.
- Reason Down - The reason the device is down, if applicable. If the device is "Up", the field is blank. Note that if an AP goes down, the "Reason Down" field may not update to "Blank" when the AP returns to an "Up" state. For APs, ignore this field if the AP Status is "Up".
- Location - The physical location of the device (e.g., Test Lab).
- Geo Location - The Geo Location of the device, if applicable (Geo Location has been specified for the device - either individually or the device is assigned to a Geo Map Site).
- System Contact - Contact information for the person responsible for the device.
- Activated Licenses - Licenses used by the device.
- FTP User Name - The CLI/FTP user name for the device.
- SNMP Version -The SNMP version used to discover the device (v1, v2, v3).
- v1/2 Read Community - The device's SNMP v1/2 "get" community name, if applicable.
- v1/2 Write Community - The device's SNMP v1/2 "set" community name, if applicable.
- v3 User Name - The device's SNMP v3 user name, if applicable.
- Last Upgrade Status - The status of the last firmware upgrade on the device.
- "Successful" - Successful BMF and Image upgrade performed.
- "Successful (BMF)" - Successful BMF upgrade performed.
- "Successful (Image)" - Successful Image upgrade is performed.
- "Failed (BMF, Image)" - BMF and Image upgrade failed.
- "Failed (BMF)" - BMF upgrade failed.
- "Failed (Image)" - Image upgrade failed.
- Backup Date - The date that the device's configuration and/or image files were last backed-up to the OmniVista Server.
- Backup Version - The firmware version of the configuration and/or image files that were last backed-up to the OmniVista Server.
- System Up Time - The amount of time the device has been "Up" since the last reboot.
- Last Known Up At - The date and time when the last poll was initiated on the device.
- Description - A description of the device, usually the vendor name and model.
- Traps - The status of trap configuration for the device. "On" means that traps are enabled. "Off" means that traps are disabled. "Not Configurable" means that traps for this device are not configurable from OmniVista. (Note that traps may have been configured for such devices outside of OmniVista.) "Unknown" means that OmniVista does not know the status of trap configuration on this device.
- Running From - For AOS devices, this field indicates whether the switch is running from the Certified directory or from the Working directory. This field is blank for all other devices. For AOS devices, the directory structure that stores the switch's image and configuration files in flash memory is divided into two parts:
- The Certified directory contains files that have been certified by an authorized user as the default configuration files for the switch. When the switch reboots, it will automatically load its configuration files from the certified directory if the switch detects a difference between the certified directory and the working directory.
- The Working directory contains files that may or may not have been altered from those in the certified directory. The working directory is a holding place for new files to be tested before committing the files to the certified directory. You can save configuration changes to the working directory. You cannot save configuration changes directly to the certified directory.
Note that the files in the certified directory and in the working directory may be different from the running configuration of the switch, which is contained in RAM. The running configuration is the current operating parameters of the switch, which are originally loaded from the certified or working directory but may have been modified through CLI commands, WebView commands, or OmniVista. Modifications made to the running configuration must be saved to the working directory (or lost). The working directory can then be copied to the certified directory if and when desired.
Note: OmniVista supports the Multiple Working Directories Feature available on OS10K and OS6900 Switches (AOS Release 7.2.1.R01 and later). This feature allows the user to create multiple Working Directories on the switch that can be used to save specific switch configurations. The user can create any name for these "Working" Directories (e.g., "Marketing Switch 02-23-18"). If the switch is running from one of these user-created directories, the directory name is displayed in this field.
- Changes - This field indicates the state of changes made to the switch's configuration. This field is blank for all other devices. This field can display the following values:
- Certified - Changes have been saved to the working directory, and but the working directory has been copied to the certified directory. The working directory and the certified directory are thus identical.
- Uncertified - Changes have been saved to the working directory, but the working directory has not been copied to the certified directory. The working directory and the certified directory are thus different.
- Unsaved - Changes have been made to the running configuration of the device that have not been saved to the working directory. For Stellar APs, an unsaved configuration may not be an issue because when APs reboot, they always receive and build their configuration from OmniVista. Saving the configuration on Stellar APs is helpful if an AP reboots and OmniVista is not reachable. In this case, APs use the previously saved configuration.
- Blank - When this field is blank, the implication is that OmniVista knows of no unsaved configuration changes and assumes that the working and certified directories in flash memory are identical.
- Discovered - The date and time when OmniVista successfully pings or polls the switch for the first time. This value remains unchanged until the switch entry is deleted. This field will remain blank if OmniVista does not ping or poll the switch at all.
- Synchronized Status - Whether the Primary CMM's working directory is identical to the working directory on the other CMM module (if present).
- Synchronized - The primary CMM's working directory is identical to the working directory on the secondary CMM. Note that if a switch is in Virtual Chassis (VC) mode, and it is VC of 1, the Synchronized Status is always "Synchronized".
- Not Synchronized - The primary CMM's working directory is not identical to the working directory on the secondary CMM.
- Not Applicable - Only one CMM module is installed.
- Unknown - The synchronization state is unknown.
- NaaS/CAPEX Device - The Device License mode of operation for the switch (NaaS, CAPEX, CAPEX Undecided). See NaaS Device Licenses for more information. Note that NaaS device licensing is supported only on switches running AOS Release 8.8R1 or higher.
- OmniVista Network Advisor - Indicates whether or not OmniVista Network Advisor is monitoring the device (Enable/Disable).
- OmniVista Network Advisor Instance - Tthe URL of the OmniVista Network Advisor instance that is monitoring the device. This field is blank if OmniVista Network Advisor monitoring is disabled.
Detailed Information
Basic Information
- Name - The name of the device.
- Address - The IP address of the device.
- MAC Address - The MAC address of the device.
- Serial Number - The device serial number.
- Status - The operational status of the device.
- AOS Devices
- Up - Device responds to SNMP requests or SSH/Telnet (as per Shell preference) ping request from OmniVista. "Up" Status does not necessarily mean that device is manageable from OmniVista. Refer to the "SNMP Status" column for management status.
- Warning - There is one or more unacknowledged trap on the device.
- Down - Device does not respond to SNMP Requests as well as Telnet/SSH ping requests from OmniVista.
- APs
- Up - AP is manageable from OmniVista.
- Warning - There is one or more unacknowledged trap on the device.
- Down - Device is not manageable from OmniVista. However, it may still be "Up" and functional on the network.
- AOS Devices
- Type - The type of device chassis (e.g., OS6860E-P24).
- Version - The version number of the device software (e.g., 8.4.1.143.R03).
- Location - The physical location of the device (e.g. Test Lab).
- Geo Location - The Geo Location of the device, if applicable (Geo Location has been specified for the device - either individually or the device is assigned to a Geo Map Site).
- Description - A description of the device, usually the vendor name and model.
- System Contact - Contact information for the person responsible for the device.
- AP Group Name - The name of the AP Group to which the AP belongs, if applicable.
Status Information
- Traps - The status of trap configuration for the device. "On" means that traps are enabled. "Off" means that traps are disabled. "Not Configurable" means that traps for this device are not configurable from OmniVista. (Note that traps may have been configured for such devices outside of OmniVista.) "Unknown" means that OmniVista does not know the status of trap configuration on this device.
- Running From - For AOS devices, this field indicates whether the switch is running from the Certified directory or from the Working directory. This field is blank for all other devices.
- Changes - This field indicates the state of changes made to the switch's configuration. This field is blank for all other devices. This field can display the following values:
- Certified - Changes have been saved to the working directory, and but the working directory has been copied to the certified directory. The working directory and the certified directory are thus identical.
- Uncertified - Changes have been saved to the working directory, but the working directory has not been copied to the certified directory. The working directory and the certified directory are thus different.
- Unsaved - Changes have been made to the running configuration of the device that have not been saved to the working directory. For APs, an unsaved configuration may not be an issue because when APs reboot, they always receive and build their configuration from OmniVista. Saving the configuration on APs is helpful if an AP reboots and OmniVista is not reachable. In this case, APs use the previously saved configuration.
- Blank - When this field is blank, the implication is that OmniVista knows of no unsaved configuration changes and assumes that the working and certified directories in flash memory are identical.
- Last Upgrade Status - The status of the last firmware upgrade on the device.
- "Successful" - Successful BMF and Image upgrade performed.
- "Successful (BMF)" - Successful BMF upgrade performed.
- "Successful (Image)" - Successful Image upgrade is performed.
- "Failed (BMF, Image)" - BMF and Image upgrade failed.
- "Failed (BMF)" - BMF upgrade failed.
- "Failed (Image)" - Image upgrade failed.
- Synchronized Status - Whether the Primary CMM's working directory is identical to the working directory on the other CMM module (if present).
- Synchronized - The primary CMM's working directory is identical to the working directory on the secondary CMM. Note that if a switch is in Virtual Chassis (VC) mode, and it is VC of 1, the Synchronized Status is always "Synchronized".
- Not Synchronized - The primary CMM's working directory is not identical to the working directory on the secondary CMM.
- Not Applicable - Only one CMM module is installed.
- Unknown - The synchronization state is unknown.
- SNMP Status (AOS Only) - Displays "Up" if the device is manageable by OmniVista, "Down" if the device is not manageable by OmniVista. This attribute is supported on AOS devices only. Column will be blank or display "Non Applicable" for other device types.
- IOT Status - Indicates whether or not
- OmniVista Network Advisor - The status of OmniVista Network Advisor monitoring for the device (Enable/Disable).
- OmniVista Network Advisor Instance - Tthe URL of the OmniVista Network Advisor instance that is monitoring the device. This field is blank if OmniVista Network Advisor monitoring is disabled.
Security Information
- FTP User Name - The user name that OmniVista will use to establish CLI/FTP sessions with the discovered devices. The user name specified will be used to auto-login to devices when CLI sessions are established. It will also be used to perform FTP with the device when configuration files are saved and restored.
- SNMP Version - The SNMP version that OmniVista will use to communicate with the device. The default version for AOS devices is v2, but v1 and v3 are also supported.
- User Name (SNMP v3 Only) - The SNMP version 3 user name.
- Auth & Priv Protocol (SNMP v3 Only) - The authentication protocol OmniVista will use for SNMP communication with the device. Authentication uses a secret key to produce a "fingerprint" of the message. The fingerprint is included within the message. The device that receives the message uses the same secret key to validate that the fingerprint is correct. If it is, and if the message was received in a timely manner, then the message is considered authenticated. Otherwise, the message is discarded. The fingerprint is called a Message Authentication Code, or MAC.
- Context Name (SNMP v3 Only) - A unique context name for this context. An SNMP context is a collection of management information accessible by an SNMP entity, in this case OmniVista. A context identifies a subset of management information, in this case the management information OmniVista has about the individual device. OmniVista, as an SNMP entity, has access to many SNMP contexts: one for each device it manages. Each context must be identified by a unique context name and a unique context ID. Note that an item of management information may exist in more than one context. Technically, the Context Name and Context ID provide a means of distinguishing specific instances of information in the MIB modules from the set of all instances of that information within the management domain.
- Context ID (SNMP v3 Only) - A unique context ID for this context. As explained above, each context must be identified by a unique context name and a unique context ID. Note that neither the Context Name nor the Context ID are required.
Other Information
- Backup Date - The date that the device's configuration and/or image files were last backed-up to the OmniVista Cirrus Server.
- Backup Version - The firmware version of the configuration and/or image files that were last backed-up to the OmniVista Cirrus Server.
- Last Known Up At - The date and time when the last poll was initiated on the device.
- Discovered - The date and time when OmniVista successfully pings or polls the switch for the first time. This value remains unchanged until the switch entry is deleted. This field will remain blank if OmniVista does not ping or poll the switch at all.
- System Up Time - The amount of time the device has been "Up" since the last reboot.
- Reason Down - The reason the device is down, if applicable. If the device is "Up", the field is blank. Note that if an AP goes down, the "Reason Down" field may not update to "Blank" when the AP returns to an "Up" state. For APs, ignore this field if the AP Status is "Up".
- Activated Licenses - Lists any additional licenses used by the device (e.g., Advanced).
Modules
Provides detailed information on any device modules (e.g., CMMs, Chassis).
Graphical Views
For a graphical view of devices grouped by category, click on the Chart View icon at the top of the screen. By default, the pie chart view is shown, with the inventory information displayed by type. Click on the bar chart option to view the information in bar chart format. Hover the mouse over a section for the number of devices in the category. Change the view using the Group by drop-down menu:
- Type - Group discovered devices by device type (e.g., OS6860E-P24, OAW AP).
- Location - Group discovered devices by physical location listed for the device (e.g., NMS Lab, SQA Lab).
- Version - Group discovered devices by software version running on the device (e.g., 8.4.1.143.R03).