
User Management
The Users and User Groups User Management Screen displays all currently-configured Users by login name (along with a brief description). The screen is used to create/invite edit, and delete Users; and can be used to reset Two-Factor Authentication for a User. Note that a User's access rights are determined by the User Group in which the user is a member. OmniVista is shipped with four pre-configured Users and four pre-configured User Groups. The default password for all four pre-configured Users is switch. For security reasons, it is recommended that you redefine the default passwords. The default Users and their default pre-configured User Group memberships are as follows:
- Administrator - This user belongs to the Administrators User Group and has full administrative rights to all switches on the network AND full administrative rights to the Users and Groups Application. The default password for this user is switch.
- Writers - This user belongs to the Writers User Group and has Read/Write access to all devices in the network. The default password for this user is switch.
- Default - This user belongs to the Default User Group and has read access to all devices in the network. The default password for this user is switch.
Note: Specific rights for each OmniVista Application for the above system-defined Users can be viewed by clicking on a User in the Existing Users Table to view the Details window.
Creating a User
Click on the Create icon and complete the necessary fields. The User Login and Password fields are mandatory. The user will use this User Login and Password to log into OmniVista. You can complete additional fields (e.g. Name, Description) to provide a more detailed description of the User. Select one of the User Groups at the bottom of the screen to assign the User to a specific User Group and click on the Create button. Note that users may belong to more than one User Group at a time, in which case their access rights are defined by the most privileged group to which they belong.
Inviting a User
As the Network Admin, you can also create new users by inviting the user to have access to your OmniVista Cirrus account.
1. Click on the Invite button at the top of the screen. The Invite User Window appears.
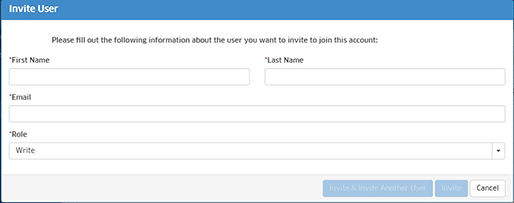
2. Complete the fields as described below, the click on the Invite button at the bottom of the window. You can also click on the Invite & Invite Another User button to quickly return to the window and invite additional users.
- First Name - The user's first name.
- Last Name - The user's last name.
- Email - The user's e-mail.
- Role - The user role assigned to the user when they accept the invitation and log into OmniVista (Read, Write, Account Admin).
The user will appear in the Existing Users List on the User Management Screen with the Status Column indicating "Invitation Sent".
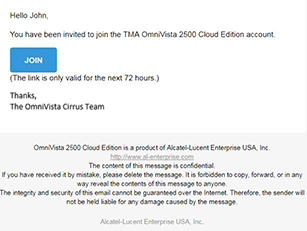
3. The user will receive the following e-mail from ALE USA Inc:
4. Once the user clicks on the Join button, they are presented with the following Password Setup Screen to create their own User Name and Password.

5. Once the user completes the fields and clicks on the Save button, the following screen appears.
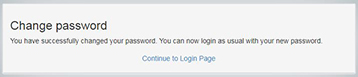
6. The user can click on the "Continue to Login Page" link to log into OmniVista. The user status in the Existing Users List will be changed to "Joined".
When you send an invitation, the user e-mail address is displayed in the Email Column and the user Status displays "Invitation Sent". You can re-send an invitation by selecting the user and clicking on the Resend button. To revoke an invitation, select the user and click on the Revoke button. The user will no longer be able to join.
Editing a User
Click on a User in the Existing Users Table and click on the Edit icon. Edit any fields as necessary and/or edit the User Groups at the bottom of the screen to re-assign the User to a different User Group. When you are done, click Apply. You will be returned to the User Management Screen. Note that you cannot edit the User Login field.
Deleting a User
Select a User(s) in the Existing Users Table, click on the Delete icon, then click OK. Note that you cannot delete the user admin.
Two-Factor Authentication
The Two-Factor Authentication Server Screen is used to enable/disable Two-Factor Authentication for user login based on User Role. Two-Factor Authentication requires a User to enter an authentication code after entering their login/password to access OmniVista Cirrus. The authentication code is a time-based, 6-digit code that is generated using the Google Authenticator App. When Two-Factor Authentication is enabled/disabled, the configuration is applied to all users assigned to a role. You cannot have different settings for different users in a role. If a user has two roles and one is enabled for Two-Factor Authentication while the other is not, the user will still be required to use Two-Factor Authentication to log in.
If a User configured for Two-Factor Authentication is unable to successfully log in (e.g., unable to set up Two-Factor Authentication, repeatedly inputting an invalid authentication code), a warning message is presented to the user and the user is redirected to the login page. The User's 2FA Status will display "Verify" in the Existing Users Table. Select the User in the table, click on the Reset 2FA button at the top of the screen, then click OK at the Confirmation Prompt. The user will then be required to set up Two-Factor Authentication again.
Existing Users Table
The Existing Users Table displays all configured Users. Click on a user in the table for more details.
- Login - The user login.
- E-Mail - The e-mail address associated with the user.
- Description - An optional user description.
- Status - The status of a user that was invited to access your OmniVista Cirrus account. Field values include "Invitation Sent" and "Joined" (user accepted the invite).
- First/Last Name - The first and last name entered for the user.
- 2FA Status - The administrative status of Two-Factor Authentication for the user in OmniVista Cirrus:
- Enabled - The User is required to set up and use Two-Factor Authentication to log into OmniVista Cirrus. This requires the user to enter their login/password and the Google Authenticator code to log into OmniVista Cirrus.
- Disabled - The User can log into OmniVista Cirrus normally with their user login and password.
- 2FA State - Indicates if the user had been set up on the Google Authenticator App for Two-Factor Authentication:
- None - The User can log into OmniVista Cirrus normally with their user login and password.
- Setup - The User is required to set up and use Two-Factor Authentication to log into OmniVista Cirrus. This requires the user to enter their login/password and the Google Authenticator code to log into OmniVista Cirrus.
- Verify - User set up Two-Factor Authentication successfully. If there is a problem with the User's Two-Factor Authentication login, select the User in the table, click on the Reset 2FA button at the top of the screen, then click OK at the Confirmation Prompt. The user will then be required to set up Two-Factor Authentication again.
- Password Expiry Date - The date at which the password expires for the user. The expiry date is configured through Enforce Strong Password.
- Assigned Roles - The User Roles assigned to the user. This tab also displays the Application Access Control configuration for the user (the user's read/write access for OmniVista applications).
- Assigned Groups - The User Group(s) to which the user belongs.