
Device Troubleshooting
The Inventory Device Troubleshooting Screen is used to send commands to network devices to troubleshoot and resolve device problems. A list of commands is provided. You can use these commands as is, or edit them for your specific situation. A Troubleshooting Wizard guides you through the steps. The Assigned Commands Table at the bottom of the screen displays any commands that have been previously issued to network devices, and can be used to access troubleshooting logs.
Troubleshooting a Device
Follow the steps below to use the Troubleshooting Wizard to issue troubleshooting commands to a network device. When you complete the wizard, the command is queued to the Activation Server. The command is issued to the device the next time the device calls home.
1. Click on the Assign Command button at the top of the Assigned Commands Table to bring up the first screen of the wizard (Device Selection Screen).
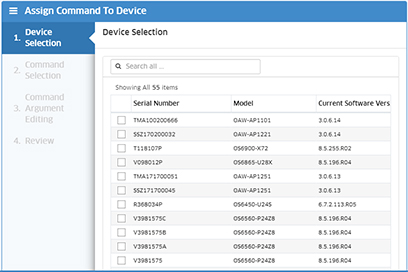
2. Select a device (you can only select one device at a time), and click on the Next button to bring up the Command Selection Screen. Click here for an overview of Troubleshooting commands.
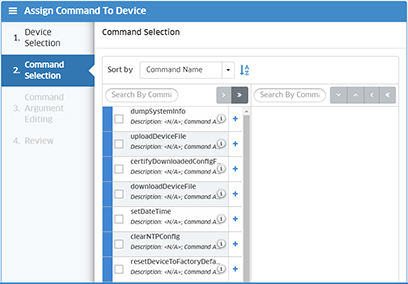
3. Select a command(s) and click on the Next button to bring up the Command Argument Editing Screen. Note that if you issue multiple commands, if the first command succeeds, subsequent commands are issued. If a command fails, all of the subsequent commands are canceled.
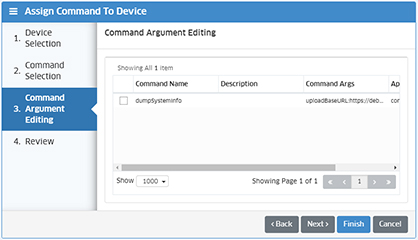
4. Commands contain default arguments, which work for many situations. If this is the case, click on the Next button to go to the Review Screen. To edit a command, select the command, and edit the command arguments as described below.
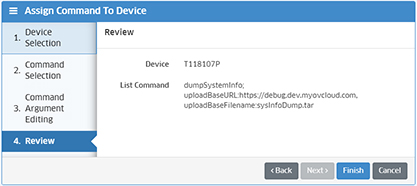
5. Review the command details. Click Back to make changes. Click on the Finish button to queue the command on the Activation Server. The command is issued to the device the next time the device calls home.
Editing a Command
When you are on the Command Argument Editing Screen, you can edit any command.
1. To edit a command, click on the checkbox next to the command to bring up the Update Information Window.
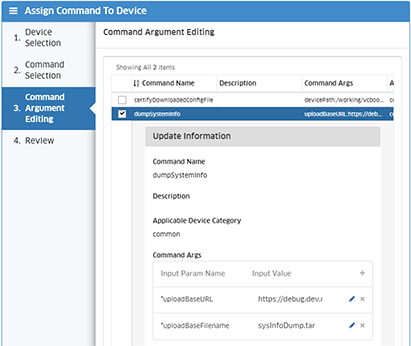
2. Scroll down to the Command Arguments area (Command Args) and click on the Edit icon next to an argument. Click in the "Input Value" field to edit the argument, then click on the Save icon to save the update. Repeat to edit additional arguments, if necessary. You can also click on the Delete icon to delete an argument from the command. Repeat the procedure to edit additional commands, if necessary. When you are done, click on the Next button to bring up the Review Screen.
3. Review the command details. Click Back to make changes. Click on the Finish button to queue the command on the Activation Server. The command is issued to the device the next time the device calls home.
Assigned Commands Table
The Assigned Commands Table lists commands that have been issued to network devices. To view commands issued to a specific device, click on the Selected Devices radio button at the top of the screen and select a device. You can only select one device at a time. To return to the default view, select the All Devices radio button. Note that you can use the Assigned Commands Table to edit and re-issue commands to a device.
- Serial Number - The serial number of the device the command was issued to.
- Command Name - The name of the command. If the command generated a file (e.g., "dumpSystemInfo"), it will be displayed as a hyperlink. Click on the hyperlink to access the file(s). Note that the first time you click on a command link you will have to log into the file server using your OmniVista Cirrus Username and Password. After this initial login, you will automatically access the server.
- Command Arguments - The arguments contained in the command.
- Command Queue Number - Commands are first sent to the Activation Server and are issued to a device when the device calls home. The queue number shows where the command is in the Activation Server queue.
- Command Processing State - The command state:
- Action Command Queued - The command is in the queue in the Activation Server.
- Action Command Sent - The device has called home and the command has been sent to the device.
- Action Command Completed - The device has received the command, attempted to execute it and reported the result back to the Activation Server.
- Status Reported - The final status of the command:
- Successful - Command was successfully executed on the device.
- Failed Command - Command failed to execute.
- Failed Connection - Failed connection to the external server.
- Failed Unsupported Command - Command is not supported on the device.
- Failed Security Check - Failed MD5 security check.
- Failed Bad Arguments - Arguments are not appropriate for the command.
- Sent Date - The date the command was initially sent.
- Last Update Date - The latest date the command was sent, or a command result was reported.
- Approximate Time of Assignment - The number of minutes before the device will call home again.
Editing Commands in the Assigned Commands Table
You can edit a command and re-issue it to a device. Select the command in the table and click on the Edit icon. The Modify And Re-Assign Command To Device Screen will appear. Make any edits as described above, and click on the Re-Assign button to issue the edited command to the device. Note that you can also re-issue the same command to a device by not making any edits and just clicking on the Re-Assign button.
Deleting Commands from the Assigned Commands Table
To delete a command from the table, select the command(s) and click on the Delete icon. Click OK at the Confirmation Prompt. You can only delete a command when the Command Processing State is "Action Command Completed".
Troubleshooting Commands
The Troubleshooting Wizard contains a list of commands that can be used to troubleshoot/resolve device problems. The commands are described below.
Command |
Use |
dumpSystemInfo |
Generate device information logs that can be used to troubleshoot a device. The logs can be accessed by clicking on the “dumpSystemInfo” hyperlink in the Command Name column of the Device Troubleshooting Table. |
uploadDeviceFile |
Upload a device file that can be used for troubleshooting. The file can be accessed by clicking on the “uploadDeviceFile” hyperlink in the Command Name column of the Device Troubleshooting Table. |
downloadDeviceFile |
Download a file on the device. This can be used, for example, to download a configuration file to a device if the device will not boot because of a bad configuration file. |
certifyDownloadedConfigFile |
Copy the Config File and Build Image Files* from the Working Directory to the Certified Directory. If a device is running well from the Working Directory, you can use this command to copy the config file to the Certified Directory. If at a later time, the device cannot boot from the Working Directory, it can then boot from the Certified Directory. AOS Devices Only. |
rebootFromDirectory |
Reboot the device from the specified directory. If a device cannot run from the current directory, you can reboot it from another directory. AOS Devices Only. |
copyFromToDirectory |
Copy a file from one directory to another directory. This command can be used to backup important files to another folder (e.g., vcboot.cfg, private key, public key). |
removeFileFromDirectory |
Remove a file(s) from the device. This command can be used to remove large, unnecessary files to free up space on the device (e.g., image.bak file, log file). |
clearCertificateAndPrivateKey |
Remove both the certificate and key with the associated base name from a device. This command can be used if the certificate and key on a device have expired or are invalid. This command removes them and updates them on the next "call home". This command is expected to be used in very rare cases. |
forceLoadNewCertificateAndPrivateKey |
Push a new certificate and private key to a device. This is useful if a certificate has expired or otherwise disappeared from a device. The certificate and private key will be updated on the next "call home". This command is expected to be used in very rare cases. |
resetDeviceToFactoryDefault |
Reset a device to factory default settings. This will remove all the existing configurations on the device. |
clearNTPConfig |
Removes all NTP configuration values from the running config and then writes memory. The date is part of the device validation process. This command removes the current NTP and updates the device with a new NTP server. |
setDateTime |
Force date and time update on the device. The date is part of the device validation process. This command can be used to update date and time on the device. |
uploadCertificateAndPrivateKey |
Upload both the certificate and the private key to the device. This command can be used to backup the certificate and the private key. Each of the arguments are expected to use Json String Escape (https://www.freeformatter.com/json-escape.html#ad-output) to replace newline to ‘\n’ and carriage return to ‘\r’. |